Re: Paleo Breakfasts (with recipe for Almond Crusted Flounder)

Of all the things that have changed in my approach to eating since I transitioned to eating Paleo, the meal that has changed the most drastically is breakfast.

It is sad (to me) but true that I had been in the habit of drinking my breakfast by way of a high-protein shake almost every day of the week. And almost every time, I would think of the lyrics to Alix Olson’s spoken word piece “I Believe,” in which she proclaims (among other things) that “I believe too many women drink their meals.” (I was bummed to discover that there were no Youtube videos of her performing that particular piece to share with you all, so as a pretty darned good consolation prize, here’s a link to her song “Eve’s Mouth.”) I suppose that these “breakfasts” did what they needed to, in that I lasted until lunch with a modicum of nutrition in my system, but they were not fulfilling.

Previous to the breakfast beverage era, my breakfasts were (as they are for many people) high-carb affairs involving lots of toast, cereal, pancakes, waffles, bagels, and/or apple fritters. Oh, how I love an apple fritter… (Note to self: develop a Paleo-friendly apple fritter recipe.)

And none of those items are even remotely Paleo. Not even a little bit.

So, what do my breakfasts consist of nowadays? Usually, it is either a poached egg or some fish served alongside some leftover veggies or salad from the previous night’s dinner and a piece of fresh fruit. I will eventually try out some of the recipes for Paleo pancakes that I see posted to an assortment of Paleo cooking blogs, but so far I haven’t felt the need to. Damn, I’m enjoying these breakfasts! They feel good, they’re quick to make, and I don’t just make it to lunch, but I thrive through the morning with energy and enthusiasm. Huzzah!

And the best part is that my breakfasts rarely take more than 5-10 minutes of actual prep time, so I’m not finding it to be any sort of hardship on my morning routine.

Since today was one of my days off, I did a little bit more than my usual plain-jane (and yet still absolutely delicious) fish preparation method of just searing or broiling a piece of lightly salted and peppered fish: I added a simple almond “breading,” and it worked out beautifully! So beautifully, in fact, that I’m going to share the recipe with all of you… I hope you like it! (Also… this probably goes without saying, but feel free to serve this recipe at lunch or dinner, too!)

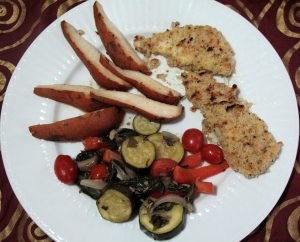
I served this delicious flounder next to some of the leftover veggies from the Mediterranean Chicken I made a few nights ago and a sliced pear... now that's a good breakfast!

I served this delicious flounder next to some of the leftover veggies from the Mediterranean Chicken I made a few nights ago and a sliced pear… now that’s a good breakfast!

Almond Crusted Flounder (serves 2)

  • 3-4 T coconut oil, divided
  • 3/4 c almond flour
  • 1/2 t sea salt
  • 1/2 t freshly ground black pepper
  • 1 minced garlic clove
  • 1 egg
  • 6 oz. flounder fillets
  1. Preheat your broiler: if it has multiple settings, set it to low. Cover your broiler pan with a sheet of aluminum foil and grease it with 1 T of the coconut oil.
  2. Combine the almond flour, sea salt, pepper, and garlic in a medium-sized bowl or large plate.
  3. Whisk together the egg and 1 T of the coconut oil in another bowl.
  4. Dip the flounder fillets in the egg mixture, and then thoroughly coat with the almond flour mixture. Place on the prepared broiler pan.
  5. Drizzle 1 or 2 more T of coconut oil evenly over the fish: this will help the breading get nice and tender-crisp.
  6. Place under the broiler for 7-10 minutes, until the fish is cooked thoroughly and lightly browned. Serve next to some veggies or a salad and a piece of fruit (maybe even a mug of yerba mate, if you’d like), and enjoy your day! It’s already off to a great start!

One Pot Mediterranean Chicken and Vegetables (with Tahini Sauce)

So, my plan for tonight was to go to see Dave Foley tonight at the Comedy Club in Webster. I was decidedly excited. I have loved Kids in the Hall since, well, since it was first aired in the U.S. back in 1989.

However, I changed my plans. I’ve had several long days this week, and I decided I wanted nothing more than an evening at home to spend cooking, writing, and relaxing. And, quite honestly, it’s been a delight. I’m not boring, I promise, I’m just a wee bit introverted. 🙂

It has now been a whopping 9 days since I went Paleo, and I am still absolutely loving it. My energy is consistent and centered through the days, I am sleeping peacefully though the nights, and waking up feeling refreshed and energized in the mornings. It even seems like my respiratory allergies aren’t bothering me as much as they usually do, but more time will tell with that matter.

I’ve been surprised at how few cravings I’ve gotten for non-Paleo food items, especially since many of the items I cook and bake at work contain sugar and grains. However,  I continue to integrate more Paleo items into the prepared foods we offer at Lori’s, and I am just amazed and inspired by how many delicious things I can eat, and am having so much fun approaching food with creativity and exploring new ideas about ingredients, that I don’t miss the things I’ve sacrificed in the name of greater health.

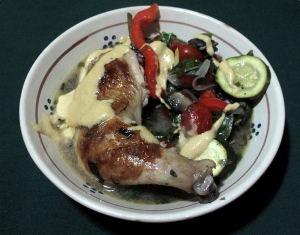
With all that said, I had fun preparing dinner this evening. (Yes, I admit it, I am in love with cooking: I get home from a full day cooking at work, and I want nothing more than to cook a bit more.) I made a big batch of Mediterranean Chicken and Vegetables, which I served along with some homemade tahini sauce, and I love it! The chicken turned out tender and flavorful, the vegetables were a built-in side dish full of tasty happiness and vitamins, and the tahini sauce complemented them perfectly… and it made enough that I don’t have to worry about lunches the next several days. It will also serve as a base for a couple of breakfasts: see the note in point 7 of the directions.

The recipe calls for a whole chicken that you quarter yourself. This definitely saves you some money if you’re going for a local, organic chicken (which, of course, I suggest doing, for health, ecological concerns, and resistance to the factory farm industry): whole chickens are priced significantly less per pound than ones that have already been cut into pieces. If you are unsure how to quarter a chicken, don’t worry, Youtube will come to the rescue: I found this video to be clear, direct, informative, and accurate.

Nothing else in either the ingredients list or the directions requires much additional explanation, so here you go:

IMG_6281One Pot Mediterranean Chicken and Vegetables with Tahini Sauce

  • 2-4 T extra virgin olive oil
  • 1 large yellow onion, thinly sliced
  • 8 oz. mushrooms, stems removed and sliced ÂĽ-1/3 inch thick
  • 3 cloves garlic, minced
  • 2 red bell peppers, sliced
  • 2 zucchini, sliced about ½ inch thick
  • 1 young organic chicken (about 3 lbs.), quartered
  • ½ bunch Italian parsley chopped
  • 2 T chopped rosemary
  • 2 T chopped mint
  • 1 T chopped dill
  • 1 bay leaf
  • Juice and zest of 1 lemon
  • 1 pint grape or cherry tomatoes
  • 8 c baby spinach leaves
  • Sea salt and black pepper, to taste
  • 5 c filtered water

Tahini Sauce:

  • 4 oz. tahini
  • Juice of 2 lemons
  • 2 or 3 cloves garlic
  • ½ t paprika
  • ÂĽ c water
  • ½ c extra virgin olive oil
  • Sea salt and black pepper to taste

TO MAKE THE CHICKEN AND VEGETABLES:

  1. Preheat oven to 300 degrees F.
  2. Place olive oil in a large, oven-proof stock pot: heat over medium heat. When the oil is heated, add the onion and sauté until fully translucent.
  3. Add the mushrooms and continue to sauté until the moisture that is released from the mushrooms is fully evaporated.
  4. Add the zucchini and bell peppers and sauté 3-4 more minutes.
  5. Add the remaining ingredients, stir to combine, and cover with an oven-proof lid. Bake for 75 minutes. Meanwhile, make the tahini sauce.
  6. Remove from the oven and set your oven to broil. Remove the bay leaves from the broth. Place chicken pieces under the broiler for about 6-10 minutes, turning over halfway through, until nicely browned. Remove from the broiler and serve on top of the vegetables and a bit of the broth, topped with tahini sauce.
  7. SAVE THE ADDITIONAL BROTH! A delightful Paleo breakfast can be made by heating up some of the vegetables and broth over the stove, poaching an egg, and eating it all together (with or without some of the tahini sauce, and with or without some of the chicken). It’s a quick and healthy start to the day!

TO MAKE THE TAHINI SAUCE:

  1. Place all ingredients EXCEPT for the oil in a food processor and combine thoroughly. Slowly add the olive oil in a thin stream until fully emulsified.
  2. Adjust seasonings to taste.

Salmon Turnover with Cucumber Sauce

I apologize for how much time has passed since my last post: I was down for almost 2 weeks with a bad case of bronchitis. I am now pretty much caught up to the speed of life now, but it took a while for me to be able to have the time to sit down and type up a post.

And actually, a couple of things happened as a result of the bronchitis that are pertinent here.

Firstly, I quit smoking. I finally just got fed up with all of the expense and the health consequences of smoking, and it has now been almost three weeks since my last cigarette. Go, me! Since then, I have really noticed the improvement of my senses of taste and smell. I can hardly believe it: cooking and eating are even more enjoyable to me than they were before.

Secondly, I had a lot of time to think as I was laying down, barely able to function, weary and sick with a head full of medicine: a long enough time, in fact, that I eventually got around to thinking about my priorities in life, whether I’m living up to my potential, and what I could stand to work on in order to be living the most authentic, healthy life possible. Blah, blah, blah.

Of all the things that occurred to me as I (literally feverishly) considered my life-in-general, one was the importance of being more financially responsible. I have committed to depositing  a percentage of each and every paycheck into an IRA (the account type, not the army type), just the way real grown-ups do. No excuses, no justifications.

And, in addition to not smoking, one of the ways that I am going to free up the funds to do so is to work to keep my food expenditures down: I spend a perhaps disturbingly high percentage of my income on yummy foodstuffs. I love yummy foodstuffs. However, I am going to be dedicating more mindfulness to feeding myself on healthy, yummy foods that are also economical.

This recipe is going to be the first in a series of recipes that I will make that require less than $20 in purchases from Wegmans. Every recipe that I am able to make for less than $20 will be tagged with “LessThan20.”

Keep in mind that I have a fairly well-stocked kitchen, so I rarely have to purchase all of the ingredients in any given recipe. Also, these prices reflect their cost at the Wegmans stores in Rochester, NY. You may have to spend more than $20 on these recipes, depending on what you already have on-hand and the prices of items in the area where you live.

So, yeah, that’s that. Now on to the recipe that is the real focus of this post…

This recipe is one that my Mom used to make sometimes, and it was always one of my favorites.It stands out in my mind as one of my favorite comfort foods. The buttery, flaky crunch of the crust; the heavenly fragrance and melty, delectable flavor of the filling; the cool smooth finish of the cucumber sauce that stands in perfect complement to the turnover… it’s a pure delight to eat.

Sadly, many years have passed since the last time I was lucky enough to have this dish. I just never remembered to ask Mom for the recipe, and so memories of this dish have taunted me and left me in a perpetual unsatisfied void of craving. -heavy sigh-

Until earlier this week. I finally remembered to ask Mom if she could please send me the recipe for this delightful, satisfying, creamy, buttery, veggie-ful, beautiful entree with a tender, flaky crust. And, joy of joys, she found it and sent it my way.

I decided I had waited long enough, and that I just had to make it right away. So, within 24 hours of getting the recipe, I was at Wegman’s grabbing all the ingredients that I needed to create the dish that had, for so long, been haunting me with its elusiveness. The only ingredients I had to purchase were the zucchini, parmesan, mushrooms, salmon and cucumber, for a total cost of $15.24. Huzzah!

Now, just a few helpful tips and tricks, and we can get right on to the recipe…

 You can used canned salmon if you are short on time, but it’s so easy to grill salmon yourself that I recommend doing it. Just take the salmon steaks and score the skin by making several diagonal slashes approximately 1/4-inch thick. Coat the fish fairly liberally with olive oil, season lightly with salt and pepper, and place on a broiler pan with the skin side up. Broil 4-5 minutes per side, depending on the thickness of the fish.

(You could, of course, stop right there and serve the salmon next to whatever seasonal veggies you choose to and have a lovely meal. But, really, you should go ahead and make the turnover.)

Cut the zucchini into cubes about 1/2-3/4 inch per side. This is large enough that their color, flavor and texture stand out, but not so large that they cook unevenly and/or make the filling seem too lumpy.

Don’t fill the turnover beyond its capacity, or the crust will rip and the Senate in your home state will be taken over by Republicans (wait: did that already happen? Sigh.). Seriously, though, put in as much filling as you can, but make sure you will still be able to fold the crust over and seal it without overtaxing the fragile dough. If you have some of the filling left over, do not worry: you can saute it for a bit to cook the egg that’s in it and eat it on its own. In fact, have it with some of the cucumber sauce: this can be a helpful way to fine-tune the seasoning of the sauce as you aim towards the perfect balance of flavors.

I STRONGLY recommend using parchment paper for both the rolling out of the crust and for baking on. It is easier to roll our dough very thinly without it ripping or tearing when you use parchment paper, plus you can roll out the dough without adding additional flour (which can make the dough dry and tough. Blech.). It is beneficial for lining the baking pan, too, because you will easily be able to get the turnover from the pan to the serving plate or cutting board without damaging it. It is sad when, after working on a pastry-wrapped goody for a good chunk of time, the pastry surrounding the filling cracks into pieces. The result of such drama is usually a messy, funny-looking pile-o-gook which, while tasty, is harder to serve and sadder to look at.

Regarding cucumbers: they are more than 90% water by weight. Thassa lotta water. And, when using them in sauces or salads, it is enough water to cause some undesired consequences: sauces can get too thin, salads can get wilted and spoiled prematurely. As a result, when I use cucumbers in sauces or salads, I always de-seed them first. This is insanely easy: just cut the cucumber in half lengthwise and, using a teaspoon, simply scoop out the seeds. The center membrane and seeds contain the runniest of the cuke’s water weight, and so this one step can help keep your sauces the proper texture and your salads fresh and crisp for a longer time.

Don’t be shy with either the sesame seeds or the sauce. They take the turnover and transform it from yummy to positively delicious.

And that’s it! In case you haven’t caught on by now, I really like this recipe, and I hope you will, too! Enjoy.

Salmon Turnover with Cucumber Sauce

  • 2-3 T butter or olive oil
  • 1/2 c chopped onion
  • 1 small yellow zucchini, in smallish bite-sized cubes
  • 1 small green zucchini, in smallish bite-sized cubes
  • 4 oz. mushrooms, sliced and coarsely chopped
  • 1T flour
  • 1/2 t dried marjoram 
  • 3 or 4 sprigs of thyme, leaves only
  • 1/4 c milk or half and half
  • 1 pound grilled salmon, cooled and flaked
  • 1/4-1/2 c grated parmesan
  • salt and freshly ground pepper
  • 1 egg
  • sesame seeds
  • 1 recipe pie crust (below)
  • 1 recipe cucumber sauce (recipe below)
  1. Saute the onion in the oil or butter until it is translucent. Add the zucchini and saute 2-3 more minutes before adding the mushrooms.
  2. Add the flour, mix well, and continue cooking for a few minutes. Add the herbs and stir gently for a few more minutes before slowly adding the milk or half-and-half. Cook until smooth, fragrant and bubbly. 
  3. Stir in the salmon and the parmesan. Adjust salt and pepper to taste.
  4. Beat the egg. Add half to the filling and set the rest aside. Preheat oven to 350 degrees.
  5. Allow the filling to cool while you make the pie crust (recipe below). Form the dough into a ball and place between two sheets of parchment paper. Roll the dough into a circle with a diameter of at least 13 inches: it will be thin and fragile.Transfer the circle of dough onto a parchment paper-lined cookie sheet or pizza stone.
  6. Spoon the filling onto one half of the rolled dough, leaving a border approximately 1/2 inch deep around the edge. Be mindful to put in as much of the filling as will fit, but no more. Fold the other half of the dough over the filling and seal the edges. 
  7. Cut a few slits into the top of the pastry, brush the dough with the remaining beaten egg, and sprinkle liberally with sesame seeds.
  8. Bake 25-35 minutes, until golden brown. Serve with cucumber sauce (recipe below).

Pie crust: 

  • 6 T cold butter, cut into small pieces
  • 1 1/2 c flour
  • 1/4 t salt
  • 4-5 T cold water or milk (more or less)
  1. Using a pastry cutter or a food processor, cut together the butter pieces and the flour until they are the consistency of rough cornmeal. Add salt.
  2. Stirring with a fork (or leaving the food processor running on low), add the liquid 1 T at a time until the dough sticks to itself: stop adding liquid as soon as the dough holds together. The natural fluxuations in humidity will affect the amount of liquid that you will need to use.
  3. Wrap the dough well in plastic wrap and chill for about 45 minutes before rolling it out.

Cucumber Sauce:

  • 1 cucumber, peeled, seeded and shredded
  • 1/2 c sour cream
  • 1/2 c mayonnaise
  • 1 T rice vinegar
  • salt and pepper to taste
  1. Drain the shredded cucumber for a few minutes to get rid of some of the extra water.
  2. Gently mix all the ingredients together. Fine-tune the vinegar, salt and pepper to your taste. That’s it!
      Crab Rangoon with Apricot Sauce

      I really, really love crab rangoon. My love for the creamy center and crispy outer shell, brought to a peak on my tongue by the sweetness of the sauce, have led to more than one late-night take-out call from my residences through the years. Mmmmmm, crab rangoon…. (insert Homer-Simpsonesque gurgly drooling sound here)

      Given the downright indecent degree to which I enjoy these fried treats, it is not big surprise that I decided that they should be one of the tasty snackity canapes available to my tastebuds over this last weekend… After all, you only turn 30 a maximum of once per lifetime, so why not make it special?

      (Incidentally, my boo and I discovered that the most amusing way to say “canapes” is to pretend you’re saying “can of peas” with a drawl. Don’t scoff. Try it. I defy you to not giggle a little.)

      It is probably to the unfortunate long-term detriment to my cholesterol levels that I discovered how fun and easy these are to make, and how much better the sauce is when it’s made at home.

      Ooh, and speaking of the sauce… if you have some left over, may I suggest you try a bit on Stonewall Kitchen’s Roasted Garlic Crackers with a schmear of fresh goat cheese? So gooooooood!

      Also, if you have some of the filling left over after you’ve filled the wontons, it’s pretty amazing as an omelet filling, along with some cream cheese and sliced scallions.

      With all that said, a few hints and suggestions:

      I splurged on real creab-meat for my birthday, and it really is infinitely superior in flavor to the ones made with artificial crab. With that said, there are few meats more expensive (and less sustainably harvested) meats, and there is a difference of $20+ per pound between the real and the artificial crab. Get the real if you can, but do what you must: I will be honest, I will probably make it with the artificial crab sometimes.

      If you do go with real crab, there is no reason to get the more expensive large-lump crab: you’ll just be breaking the lumps down, so it’s actually kinda silly to do so.

      Don’t skip the step where you chill the wontons between the two fryings, even if you are planning on serving them immediately. Cooling them down helps to ascertain that the filling doesn’t overheat and leak out of the wrappers.

      Regarding the oil: I suggest using at least 25% peanut oil, instead of just canola. This will really enhance the flavor of the crispy outer-layer.

      You will never fry more than three at a time, because the fry time is so short. If you have a deep-fat fryer, great. If not, you can just use a medium-sized saucepan for the oil: you don’t need to use a large pan.

      Make sure the fat is hot enough before you start frying, or you will end up with floppy, flaccid, unappetizing canapes. No one loves a flaccid canape. It is, of course, optimal if you have a deep-fat thermometer. If you don’t, scatter in a few drops of water from your fingertips into the oil. If it really comes to life, popping like Rice krispies’ evil big brother, then you may begin.

      These can be prepared in advance, and then kept in the refrigerator until you are ready for the second-fry: we didn’t eat them all the first night I made them, and so I was able to enjoy some, fresh and hot and crispy, the next day. And I was happy.

      Crab Rangoon with  Apricot Sauce

      • 1 lb. cream cheese, softened
      • 1 lb. crab meat (separated into small pieces if in chunks)
      • 2 t garlic, chopped
      • 2 oz. scallions, sliced
      • salt and freshly ground pepper to taste
      • Worcestershire sauce to taste
      • sesame oil to taste
      • 48 wonton skins

      For the sauce:

      • 12 oz. apricot preserves (preferably one with no corn syrup in it, and of course locally-made is usually better)
      • 1 T + 2 t fresh ginger, grated (or to taste: I love the taste of ginger, so I really put it in there)
      • 1 1/2 t dry mustard
      • 2 T red wine vinegar
      1. Place the cream cheese in the bowl of a mixer and mix until soft.
      2. Add the crab meat, garlic and green onions. Season with salt and pepper, Worcestershire sauce (about 1 t) and sesame oil (about 2-3 t).
      3. Place several wonton skins on a work surface. Brush the edges with water. Place approximately 1 T of the cream cheese mixture in the center of each skin (after you do a few, you will get a sense of just how much to add for them to be full, but not too full to seal). Fold the wonton skin in half and seal the edges.
      4. Deep-fry the wontonsat 350 degrees F, one at a time, for 10 seconds. Remove with a pair of cooking tongs, drain well, and refrigerate until cooled or until you are ready to serve.
      5. At serving time, deep-fry the wontons at 350 degrees F, three at a time, until crisp, approximately 1 minute. Serve with Apricot sauce.

       To make the sauce:

      1. Combine all the ingredients in a small, heavy-bottomed saucepan and heat until the preserves melt and the flavors blend. Best hot or at room temperature.

      Chicken Divan (with bonus recipe for Honey-Mustard Vinaigrette)

      This was one of those weekends that just didn’t feel like a weekend. I have had one commitment after another, which continued until I got to a point where my bodymind pretty much just shut down. We’ve had leftovers for dinner the last two nights, just out of necessity.

      Now, don’t get me wrong: I don’t mind leftovers, especially when the food that is leftover is delicious and homemade. But you can only have leftovers for so long until– well, until there’s no food that’s leftover. And, of course, Lee returned to Buffalo today for hir next week of law school, and I like to make sure ze has some good food to take along with hir. These factors meant that, tired or not, I had to cook dinner yesterday night.

      I decided the best bet was to take it a little easy on myself and make a casserole. Casseroles can be a beautiful, simple and delicious way to get a balanced meal. I made this casserole yesterday, and served it alongside a salad made with baby greens, dried cranberries, home-grown cherry tomatoes and a honey-mustard vinaigrette (recipe also in this post) and some warmed  whole-grain bread with garlic butter.

      This recipe is also posted with my good friend and dharma sister Reaunna in mind. You see, Reaunna recently posted a request on Transgustatory’s Facebook page that I put up a recipe for “a casserole that doesn’t involve green beans or cream of mushroom soup.” How can I resist such an amusingly specific request? (Especially since I had more than enough green bean casserole growing up. It was kind of a staple in some family members’ homes. Don’t judge: I lived in the Midwest.)

      Now, many recipes for chicken divan that you will find nowadays DO call for canned cream of mushroom soup. A disheartening number of them, in fact: I looked up a good two dozen different recipes for it when Lee requested that I make Chicken Divan for us, and the vast majority called for cream of mushroom soup. What follows is my amalgamation of the best parts of all of them, with a laudatory absence of condensed soup products.

      One of the ingredients in this recipe is leeks. Leeks are wonderful. According to my prized cookbook On Cooking by Sarah Labensky, Alan Hause and Priscilla Martel (thanks, Dad, for supporting my love of cooking with this indulgent cookbook that I never could have afforded!), “their flavor is sweeter and stronger than scallions, but milder than common bulb onions.” This makes them optimal for adding some richness and flavor to dishes made with a white sauce.

      Their peak season is from fall to early spring, but they can be grown in many regions year-round. One thing to keep in mind when preparing them is to cut them in half lengthwise and rinse out the gritty dirt between the layers. A bite full of grit will ruin an otherwise perfect dish.

      Also, you can use some of the green part of the leek, but the tough, dark-green top should be cut off. The dark-green parts can be used to make stocks (as they are in this recipe), but shouldn’t be chopped up and used in the dish itself. They are too tough. Who wants hard-to-chew, grassy onion gum? That’s right: no one.

      Another hint in the best interest of the dish: if the broccoli stalks are stringy or tough, go ahead and peel off the tough outer layer.

      And, speaking of broccoli, it is VERY, VERY IMPORTANT THAT YOU DO NOT OVER COOK THE BROCCOLI. Was I too subtle? I really hope not. Unless you actually enjoyed eating the brownish, texture-less glop of overcooked, cloyingly-odorous substance that once may have been broccoli that was served in your elementary school cafeteria, you need to trust me on this. The desired point at which to drain the broccoli is when it is bright green and “crisp-tender,” as my Dad calls it: that is, easy to bite through without a crispy-crunchy sound, but still quite firm in the center.

      On the same subject: it is actually important to have the broccoli and the chicken in two separate layers. You may be tempted to just mix it all together: what’s the difference, right? Well, the difference is that the flavor of the chicken is enhanced by being on the top and getting slightly browned, while being on the bottom layer helps insulate the broccoli from being cooked too much during the baking process. Plus, it looks cool and yummyyummy with the layer of sharp cheddar cheese between the green of the broccoli layer and the golden brown of the chicken layer. Pretty foods taste better: I don’t know why, but it’s true. It may seem tedious, but it is well worth the extra three minutes it takes in prep time for the end result.

      Traditionally, Chicken Divan is made with sherry. Here’s the thing: I don’t like sherry, and I don’t want to spend my money on it: all it would do would be grow dusty in a corner of my cabinet, which for some reason seems wasteful to me. However, I didn’t want to completely lose the flavor and texture benefits of a dry alcohol in the sauce. So, I substituted an extremely dry, rich white wine, and thought the result was delicious. So, use the traditional sherry, or substitute white wine if you’re more likely to finish a bottle of that than of sherry, or omit it all together if you don’t cook with alcohol. Whichever way you decide to go on that, the recipe itself is so solid and flavorful that you won’t go wrong.

      Chicken Divan

      • 1 stick butter, divided
      • 1T olive oil
      • 1 large leek or two small leeks, cut in half lengthwise and then sliced into crescent-moons (as pictured above) 
      • The dark-green tops of the leeks, washed, rinsed and left whole
      • 1 1/2 lbs. chicken breasts, cut into quarters
      • 1 large head broccoli or three broccoli crowns: washed, rinsed and cut into bite-sized pieces
      • 1/3 cup flour
      • 1 c slivered almonds
      • 1 c light cream
      • 1 cup sour cream
      • juice of 1 lemon
      • 1/3 lb. shredded parmesan cheese
      • 1/4 c sherry or dry white wine
      • 1 c shredded sharp cheddar cheese
      • 1 c bread crumbs
      1. Melt 1 T of the butter in the olive oil in a heavy-bottomed saute pan. Add the leeks and saute over medium heat until they are soft and translucent. Set aside.
      2. Bring 8 cups water to a boil. Add the chicken and the green tops of the leek. Boil until the chicken is fully cooked, approximately 10-15 minutes. Remove the chicken and leek tops with a slotted spoon: DO NOT DRAIN. Discard the leek tops; set the chicken aside to cool some.
      3. Add the broccoli to the water in which the chicken was cooked. Cook only until bright green, 3-5 minutes. Drain, but reserve 1 1/2 cups of the broth for the sauce. Mix the leeks and the broccoli.
      4. Melt 4 T of the butter in a heavy-bottomed saucepan. Add the flour, and stir until smooth and fragrant. Slowly and gradually stir in the reserved broth. Stir in the almonds and cook, stirring constantly, until thick and bubbly. Lower the heat to medium-low. Gradually stir in the cream, sour cream and lemon juice: cook for 2 minutes, still stirring constantly. Add salt and pepper to taste, then stir in half the parmesan and the sherry or dry white wine. Remove from heat. 
      5. Preheat oven to 350 degrees F. 
      6. Shred the chicken into small pieces with your fingers.
      7. Add half the sauce to the chicken, and half to the broccoli. Stir gently but thoroughly. 
      8. Melt the remaining butter, and stir into the breadcrumbs. 
      9. Put the broccoli into a lightly buttered casserole dish. Top with the cheddar cheese, then cover with the chicken mixture. Top the chicken with the remaining parmesan cheese, then distribute the breadcrumbs over the cheese. 
      10. Bake for 30 minutes, until the sauce is bubbly. Increase heat to 450 and cook approximately 10 more minutes until the top is browned. Allow to sit 15 minutes before serving.

       Honey-Mustard Vinaigrette

      • 2 T apple cider vinegar
      • 1/4 c lemon juice
      • 2 T honey
      • 2 T spicy mustard
      • 1 1/2 t tarragon
      • 1/2 c olive oil
      • salt and pepper to taste
      1.  Place the first five ingredients in a blender. Blend over first low, then high speed.
      2. Gradually, in a slow, thin stream, pour the oil through the hole in the lid with the blender still going. Doing this slowly and on high speed will help prevent separation of the ingredients.
      3. Season with salt and pepper to taste: fell free to adjust the amounts of the lemon juice, honey, mustard, tarragon and oil to suit your taste preferences.

      Shiitake and Avocado Bison Burgers

      When Lee and I do eat red meat, it is almost always bison.  This is for both nutritional and ecological reasons.

      The nutritional comparison between beef and bison is actually quite startling. According to an article onSuite101.com by James Clausen titled “Bison Meat vs. Beef—Burger and Steaks,” the nutritional facts break down like this:

      “Bison, ground, grass-fed, cooked 3 oz.
      •    Calories 152, Total Fat 7 grams (3 grams saturated fat)
      •    Excellent protein with 40 grams, which is 84% of the daily value (DV) in a 2,000-calorie diet.
      •    The biggest negative is that bison is high in cholesterol with 82 milligrams or 27% of the daily value.
      •    Ground bison is high in vitamin B6 (17% DV), B12 (35% DV) and niacin (25% DV)

      Beef, ground, cooked 3 oz. 85% lean, 15% fat
      •    Calories 210, Total Fat 12 grams (6 grams saturated fat)
      •    Good protein with 21 grams, which is 43% of the daily value (DV) in a 2,000-calorie diet.
      •    The two biggest negatives are that beef is high in cholesterol with 75 milligrams or 24% of the daily value. Beef is also high in saturated fats with 6 grams, which is double the amount found in grass fed bison.
      •    Ground beef is high in vitamin B6 (15% DV), B12 (36% DV) and niacin (24% DV).”

      Even more important than that, though, is that bison is not raised in a factory farm setting. Ever. They are too wild: put them in a barn, no matter how roomy, and they’ll probably just bust down the door. Furthermore, the standards for raising bison are higher than they are for raising chickens or cattle. Every time you purchase bison, you can be sure that you are purchasing a free-range product. As if that isn’t enough, the National Bison Association prohibits the use of growth hormones and animal by-products on bison. Yaaaaay!

      (Interesting fact: the largest bison farm in the world belongs to Ted Turner, and is the home of over 50,000 bison. Even this herd, which could be expected to be the most factory-farmy given its size, has approximately 2 million acres on which to roam, and are almost exclusively grass fed.)

      So when, earlier tonight, Lee said that she was craving protein, I took a quick trip to the Wegmans to get the ingredients for a comfort-food meal of bison burgers and homemade french fries (recipe to follow in a later post). 

      One thing that you will probably learn about me: I tend to believe that there are very few savory dishes that aren’t improved with the addition of either mushrooms and/or avocado. Think about it: it’s pretty much true. I also believe that almost all sandwiches require mayonnaise, homegrown tomatoes, and homegrown lettuce to be as good as they can be. So, yeah, I just piled some of all of that onto these delicious, meaty sammiches.

      Now, here’s the thing: so many people mess up their burgers by adding stuff that they mistakenly believe will improve their flavor. When you have good, fresh bison meat, all you’re going to do by adding things to the burgers is detract from their hearty, earthy flavor while risking compromises to their texture. Trust me. All you need is a big hunk of meat. That’s all.

      Shiitake and Avocado Bison Burgers

      • 2 T olive oil
      • 6 oz. sliced shiitake mushrooms
      • 1 avocado, sliced
      • 1 homegrown (or locally grown) tomato, sliced
      • 4 leaves freshly grown lettuce, washed and dried
      • 4 sourdough hard rolls
      • 1 pound ground bison
      • 1 T butter
      • 4 slices muenster cheese
      • salt and freshly-ground pepper
      • mayonnaise
      1. Heat the oil in a medium-sized saute pan over medium heat. Add the sliced mushrooms. Stirring frequently, saute them until their juices release and then fully evaporate. Season to taste with salt and pepper. Keep warm over low heat.
      2. Slice the rolls in half if they aren’t already cut. Wrap them individually in pieces of aluminum foil. If you are environmentally-minded, use heavy duty foil, being careful not to rip it: you can rinse it off and save it for the next time you need to warm up rolls. Place the wrapped rolls in a 200 degree F oven and allow them to get warm while you cook the burgers.
      3. Shape the burgers into four evenly-sized patties in the shape of the buns, but a little bit larger: they will shrink some while they cook.
      4. Heat a pan over medium heat; add the butter, stir to coat, and gently place the burgers in the pan. Cook without turning until the juices start to seep out over the top surface of the patties. Flip them over and top then each with a slice of cheese. Cook about 3-5 minutes more, depending on how done you like the burger.
      5. Remove the buns from the oven: spread on the desired amount of mayonnaise, sprinkle the mayo with any additional salt or pepper that you desire, and top with one of the burgers before adding as much of the available toppings as you want.